We’re back and now on track for gifts for your fellow makers or people who love to organize their tools;). The Stowe Bag pattern recently launched and we love this collaboration between Fringe Supply Co. and Grainline Studio.
After making the first one, we wanted to see how it would work to line it. And lo and behold – it worked! Today, we’re walking you through the steps we took to make this update to the pattern. Since we had already made the small version, we tackled the large version of the bag. Please note that we did this approach for the lining so that we could uphold the original elements of the pattern rather than lining through facing the panels. Our intent wasn’t to change the final look completely but have a finished and contrast inside.
A couple of things to note here, we won’t show all the steps of making the bag, you’ll want the pattern of course but we will show you the steps needed to line it as we did.
Ever the fabric conservationists, we did one thing we usually recommend not to and we used the selvedge edges when we cut the lining fabric so that we could just use 3/4 yard versus cut an additional 1.5 yards as we were using one of our most favorite prints that just came in, which is 45″. Since seam allowances were the same width as the selvedge, it worked well.
Here’s what you’ll need:
- Stowe Bag pattern by Grainline Studio + Fringe Supply Co.
- Suggested yardage for the large version of the bag
- Plus 3/4 yard of a lining fabric (you’ll want to reverse the yardage if you want your pockets to match to the lining; we used the exterior fabrics for the pockets)
- Scissors (rotary cutter and mat helpful since there are a lot of straight lines but optional)
- Chalk or fabric marker
- Tracing Paper
- Bias Tape or we used our left over fabric from the exterior fabric to make our own (high aversion to using the dreaded wrights bias tape)
- Clear gridded ruler or template
- 6 inches by width of scrap canvas (or similar) or at least 23″ wide for interfacing. Fusible or sew-in interfacing will work too
You’ll first trace and cut out your pattern per the instructions. You’ll also want to cut two additional main panels from your lining fabric. If your pockets are going to match the lining then cut those out accordingly.
Assemble your pockets and attach to the two lining panels. Once assembled, you’re ready to install the boxed corners or faux gusset for the lining. The structure of the Stowe Bag comes from its approach to the gusset but as we wanted to not have the exposed seams, we used our typical approach to boxing our corners.
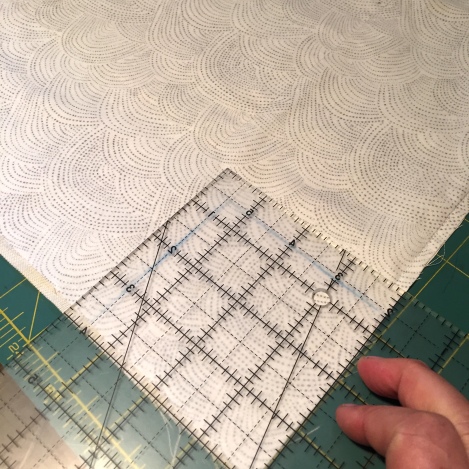
Using the measurements for the gusset, you’ll want to use a clear gridded ruler or template and mark a 4″ square from the bottom corners of each panel (four total). You’ll then cut them out. Because I wasn’t quite sure this would work, my initial plan was to do 3.5″ so that if it didn’t work out, I had a buffer, but after more review and a little faith, I went for the four inches to match and it matched!
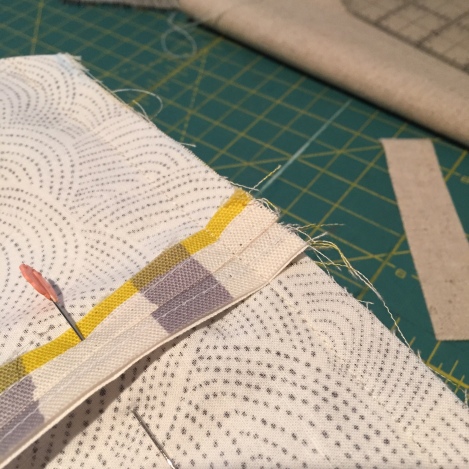
You’ll then sew the two panels right sides together, sewing the side seams and the bottom seam (don’t sew the seams you cut out). Press all seams open and then join the side and bottom seams.
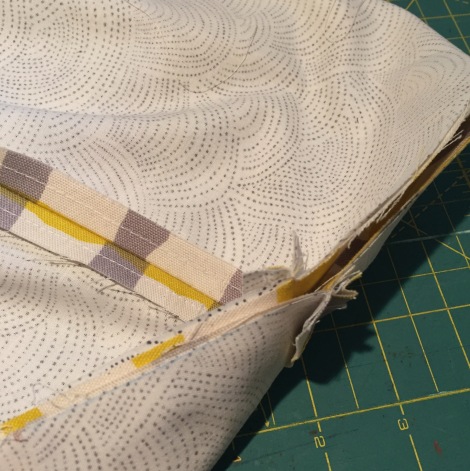
Pin and sew from edge to edge, backstitching at beginning and end.
You can now set the lining portion to the side while the exterior is prepped.
Since adding a lining takes away part of the weight and structure the regular version of the Stowe gets from the gusset approach, we wanted to make sure that wasn’t lost. You can do this with fusible interfacing, but as many of you might have experienced, installation can cause ripples in the fabric if it doesn’t go well. Similarly sewing in an interfacing material can cause problems if it’s not sewn well.
To avoid a stitch line, we took two three-inch strips of scrap canvas and sewed the sides and bottom seams at a 1/4″ seam allowance. So that it didn’t fold or flip over, a tack very three to five inches was done on the right side. They were and are almost invisible on the bottom of the bag.


Assemble the side and bottom seams of the exterior as instructed.
This is where we have to depart in the sequence of pattern’s instructions. Rather than install the bias binding, you’ll want to follow the instructions on installing the gusset. Everyone we’ve talked to who has made this great bag has talked about a small little plea to their machine to get through all these layers. We recommend increasing your stitch length on this seam so that your needle has more time to move through all those layers.
All right, now that all the structure for the base is there, insert the lining into the exterior, wrong sides together. To make all the layers easier to navigate on the side seams, baste the layers together at a 1/4 or 1/8 of an inch. It’s essential that your raw edges be matched up completely here.


Get your bias binding ready. For this version, we went with a different fold and just folded the strips in half rather than the quarter fold. While it can make a little more bulk, it’s kind of nice not to have to worry about missing the hem on your topstitching.
We love ourselves wonder clips for binding and so use those or pins to attach your bias binding as instructed to the side seams. Then press open and then towards the binding. If you don’t have a seam roll, ask for one for the holidays, they’re super handy for seams like these.


Next fold over the bias binding to match your original stitch line onto the lining side. Press well. Clip or pin securely in place. When you get to your machine, first put the project with the lining side up and see what the best seam allowance will be for a good topstitch and least likely you’ll miss it. Once determined, switch to the exterior side, increase your stitch length and topstitch to secure the bias binding in place.


Now you’ll need to sew the shoulder seams, right sides together (interior to interior and exterior to exterior). Press open and then follow the pattern instructions to fold in the strap.


It’s now go time for the main bias binding seam. Since the raw edges were matching up well, there was no basting before binding but not a bad idea. Next, follow the same instructions as above to install the binding, trip threads and you’ve got it!


That’s not exactly “lining”. That’s just two layers of fabric sewn together. When I think of lining I think of clean finish, no need for binding or finishing edges because the lining will cover the raw edges …
Oh apologies that we didn’t use the correct terminology in your eyes. We called it lined since it still upholds to the original construction of the bag and does have a finished inside which the original pattern does not.
Love the tutorial, linking to it now! Also as far as lining vs clean finishing, they don’t necessarily mean the same thing. Generally speaking, lining means it has a lining and raw edges are hidden from the inside of the garment, not that it’s completely clean finished, which is why the term “clean finish” also exists! In designing this pattern we loved the look of the binding as a design element, a way to showcase a second fabric, or maybe match a contrasting pocket fabric, and as a way to keep the pattern more accessible to beginner sewers and love that you kept the essence of the bag with the tutorial! ❤
Thanks so much Jen!
Pingback: Elsewhere | Fringe Association·
Thank you very much for this tutos. (By the way… who cares if it’s lining or clean finish… ).
Thanks for your work
Nice tutorial, thanks so much for sharing. This would be a nice way to make a “dressy” Stowe….out of a pretty silk, maybe. I have been wanting to try one like that.
I have made several of these in Painter’s canvas, and a couple in ticking, both of which are quite sturdy. And as a way to make the insides neater, I cut the pocket as one long piece, rather than two (placing the bottom “seam line” on the fold.) Then I seam the two main pieces before basting the one long pocket piece in place (wrong side to wrong side). I then do the topstitching that forms the pockets. I also make a “boxed corner” that is trimmed and clean finished. This makes for a very neat interior, almost “lined”, but not quite. 😉
Pingback: STOWE BAG : NANI IRO MOUNTAIN VIEW | make something·
Pingback: Stowe Bag Trio – Girl and Machine·
Hi there
Just a few questions:
1. Just wondering when you do the gusset are you doing this as per step 15 ie sewing it in permanently or you just doing up to the step 13.
2. When you cut out the corners, do you also cut through the lining?
3. Can I safely cut out 3″ corners if lining the small bag?
thanks
steff
Hi Stephanie!
In answer your your first question – the gusset for the lining happens after you assemble and attach your pockets to the lining pieces. For the outer bag you do it before any of the binding steps after sewing the side seams.
To the second – the corners are only cut on the lining piece. The outer bag is per the pattern of folding it over.
For the third – the small bag, 2 to 2.5 inch corners should be good since the finished outer bag has a five inch wide base.
Thanks!
Thanks muchly.
steff
sorry I just realised that with # 2 I meant to say do you cut through the pocket fabric as well ( I would presume you would)s.
steff
Pingback: Make a project bag for knitting and sewing - Made@Ginjer·
Hi!
For the small bag, how wide is the canvas strip? And this strip is added to the bottom of the wrong side of the exterior fabric, correct?
Thanks!
Paige
Hi Paige, So sorry for missing your question last month – yikes! For the smaller bag you’d make the canvas strip the same height as the pockets you’re going to back. Don’t have the pattern with me but hopefully, it’s a quick fix for you. Thank you!